
Are you looking to create high-quality how-to and listicle articles that captivate your audience and provide them with valuable information? If so, you’re in the right place. In this article, we’ll provide you with a comprehensive guide to creating engaging and informative content that will keep your readers coming back for more.
Whether you’re a seasoned writer or just starting, we’ve got you covered. We’ll provide you with a step-by-step guide on how to structure your how-to and listicle articles, including tips on creating effective subheadings, adding images and alt text, and formatting your text to ensure readability.
So, let’s get started!
Table of contents
Part 1: General Rules
- In these articles, there are two versions available typically.
- HOW TO articles
- Listicle articles
- Also, add meta description of 160 characters (with spaces) on all these articles.
- Make sure to give 10 of each answer: Like, 10 methods for How-to content and 10 products under listicle articles.
- In how-to articles, try to give steps + images for all methods. If you cannot do so in some of them, that’s okay. BUT try to keep these to a minimum.
- Add Alt text and Image text for all pictures.
- Keep the structure format with Left alignment + Calibri + Size 12 (for normal text part) + 1.0 line spacing between sentences + add sentence at paragraph endings feature.

____________________________________________________________________________________________________
Part 2: Structure for How to Articles:
In the how-to articles, typically you must focus on steps-related sections to explain how some apps work.

The typical structure involves:
Introduction
(with 100-120 words)
Another Subheading (similar to the main title. e.g., “Top 10 Ways to…”)
2-3 lines introducing how you will explain the different methods/solutions/fixes for the How-to content. Then, list each method with different subheadings (in H3) and starting each part with “Fix 1:” or “Method 1:” or on article type.
Method 1: XXXX
Add content here, with steps.
Step 1, step 2, etc.
Add pics with the steps.

Method 2: XXX
Add content here, with steps.
Step 1, step 2, etc.
Add pics with the steps.
…
Method 10: XXX
Add content here, with steps.
Step 1, step 2, etc.
Add pics with the steps.
Conclusion
Summarise the article in 50-80 words.
____________________________________________________________________________________________________
Part 3: Structure for Listicle Articles:
Make sure to add 10 products in each listicle article.
Follow this structure:
Introduction
(with 100-120 words)
Another Subheading (similar to the main title. e.g., “Best 10 Epub Readers…”)
2-3 lines introducing how you need to know the types of products available for best results. Then, list each product with the product related format (mentioned below in Part 4). Keep the product names in H3 each.
Product 1
Info
Product 2
Info
….
Product 10
Info
Conclusion
Summarise the article in 50-80 words.

___________________________________________________________________________________________________
Part 4: Product-Related structure to follow in listicle article types
- You must add alt text + image text for all product images.
- Then, add a description about the tool/software/app in 50-60 words.
- Add device compatibility: Windows, iOS, Android, online, etc.
- Add cost of the app.
- Add 4 features.
- Add 3 pros.
- Add 2: cons.
NOTE: DO NOT write repetitive or generic pros and cons. Study the official website well to find pros and cons unique to the software, instead of generic ones like “easy to use”, “free for users”, etc.
Structure format template:
1. Tool name in H3 format
<insert image here>
Alt text: tool interface
Image text: add-title-name-in-this-manner-here-with-dashes-in-between-words-and-ending-within-pic-number-in-sequnece-01.jpg
<write description about the app here related to your topic>
Price: XXX
Device Compatibility: web-based/Windows/Mac
Features:
- XXX
- XXX
- XXX
- XXX
Pros:
- XXX
- XXX
- XXX
Cons:
- XXX
- XXX

____________________________________________________________________________________________________
Part 5: Image-Related Rules
Rule 1: In case of how to articles, you must add steps related pictures. Get theme from Google or the sites you are referencing.
Rule 2: Make sure that the images are have clear quality and not hazy.
Rule 3: Choose images without any watermark. If there are any, crop it out or use another image.
Rule 4: Follow the sizing rules as mentioned in next part.
Rule 5: In case of listicle articles, add product interface images. Get them from online or screenshot it if its not available.
Rule 6: For vertical images (*mobile screenshots), keep the size as 550 under Vertical.
e.g.,

For horizontal images (*desktop screenshots), keep the size as 750 under Horizontal.
e.g.,

How to Save Images?
The following are the steps to save images. For screenshots and by search. For example, I am giving steps for adding an image of Instagram app to an article.
Steps via Screenshot.
Step 1: Go to the place where you are screenshotting from. For, example, the Apple App Store section for Instagram app.
Right-click on the image to open.

Step 2: and screenshot the bigger view of it.

Step 3: After screenshotting, go to your document and paste it in place.

Step 4: Right-click on the image and press “Save as Picture”.

Step 5: Save with the image text in your folder and save it in JPEG format.

Step 6: Go the folder, and double-click on the image to open it.
Step 7: Press Edit Image.

Step 8: Crop the image to cut out the edges and press Save.

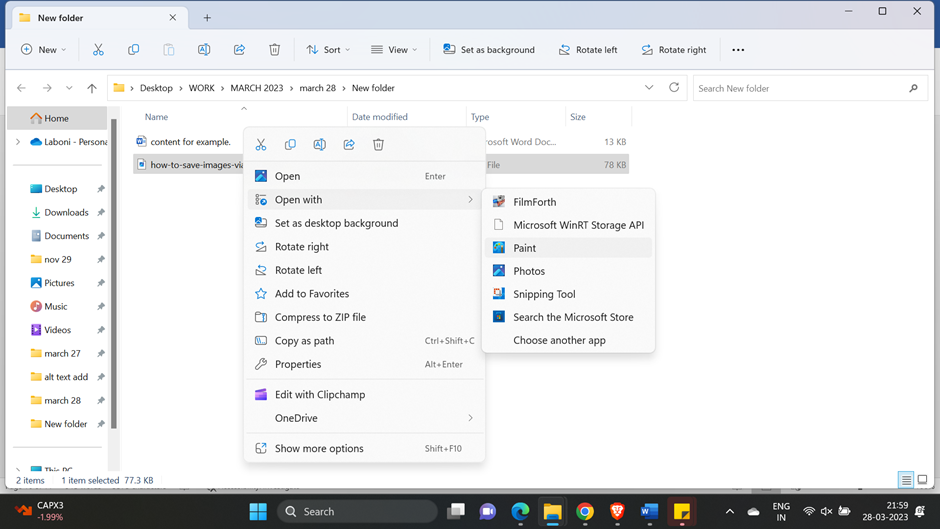
Step 9: Then, back in the folder, right click on the image and choose Open With…> Paint.
Step 10: Tap on Resize and Skew.

Step 11: Tap on Pixels and change the Vertical to 550 (since this is mobile app screenshot. For horizontal screenshots, change Horizontal to 750). Then, press OK > Save.

Step 12: Go to your document and press Insert > Image > add this image from the folder.

Steps via Search.
Step 1: Go to Google and search for “Instagram interface” under Google/Google Images.

Step 2: Choose an image and right click > Save.

Step 3: In your device, double click on it to open and press Edit image to crop the file.

Step 4: Follow Steps 9 to 12 mentioned under screenshotting steps option.
____________________________________________________________________________________________________
Part 6: Alt Text-Related Rules
You have to add “alt text” and “image text” under all images.
- For the alt text, you must mention what describes the image. For example, “app interface” for the screenshot of the product’s interface.
- For the image text, add the name of the title with dashes in between and end with its number in the sequence of images within the article. So, if your article title is “10 Best Books to Read”, the first image will be “10-best-books-to-read-01.jpg”, the second will be “10-best-books-to-read-02.jpg”, etc.
- DO NOT CAPITALIZE image or alt text letters.
- Save the image files with their image text name.

____________________________________________________________________________________________________
Part 7: ZIP-Related Information
Step 1: In the folder you saved the images, choose all of the images.

Step 2: Right click and choose “Compress to ZIP file”. This becomes the Images zip. Save it as image text name with “images” at the end.

Step 3: Now, in the same folder, choose the doc file and the compressed images file together and right-click > Compress to ZIP file.

Step 4: Save it with “ZIP_title name” and this is the final file you will send.
Conclusion
By following our comprehensive guide, you’ll be able to create high-quality how-to and listicle articles that provide value to your readers. From effective subheadings to formatting your text, our tips and tricks will help you create engaging and informative content that stands out from the crowd. So, what are you waiting for? Start creating content that captivates your audience today!
